Showing posts with label .NET. Show all posts

Wednesday, June 28, 2017

Step By Step : Excel-DNA, C#, Excel User Defined Functions

Hi,

Welcome to my blog of Excel DNA using Visual Studio and C#. In this post we will see how to
create Excel User Defined Functions ( UDFs ) using Visual Studio and C# by using Excel-DNA.

Introduction: 
As per https://excel-dna.net/, Excel-DNA is an independent project to provide high-performance user-defined functions ( UDFs ), create custom ribbon bar and more to your Excel sheet. It allows to develop native .xll add-ins for Excel using C#, VB.NET, F#. It helps to integrate .NET into Excel.

Prerequisites:
Since we are integrating .NET into Excel we need Visual Studio. We can get Visual Studio 2015 Community Edition for free at https://beta.visualstudio.com/downloads/.

Once you install Visual Studio you are ready to go. So let's dig in and see step-by-step guide of creating a user-defined function ( UDF ) and execute that in Excel.

Create Project:
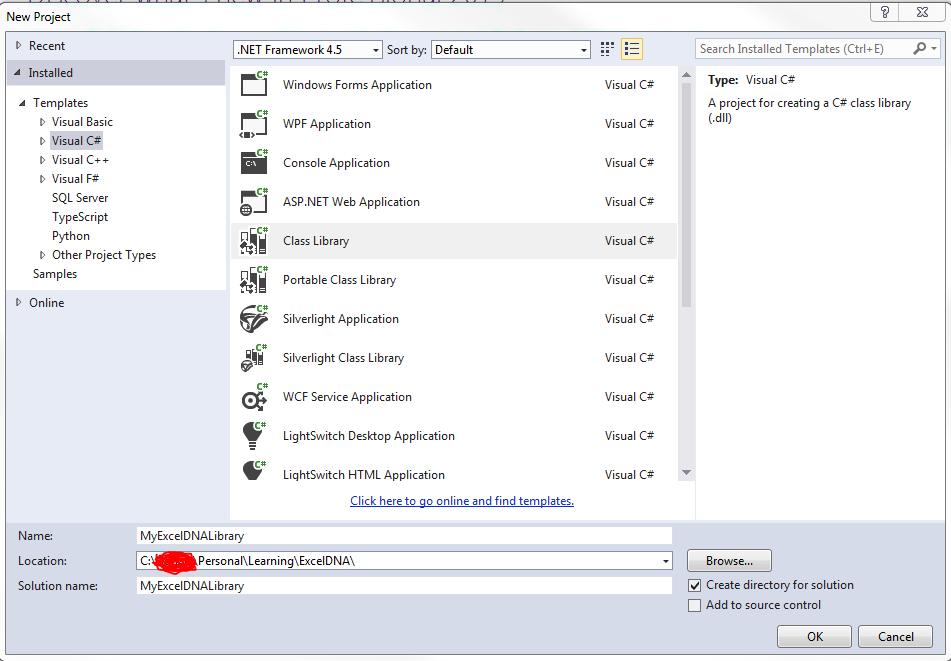
Launch Visual Studio. You need to create a Class Library Project. You can create by going to
File -> New -> Project and select Visual C# and then select Class Library project and give it a name like MyExcelDNALibrary. Please see below


This creates a new solution for you like below


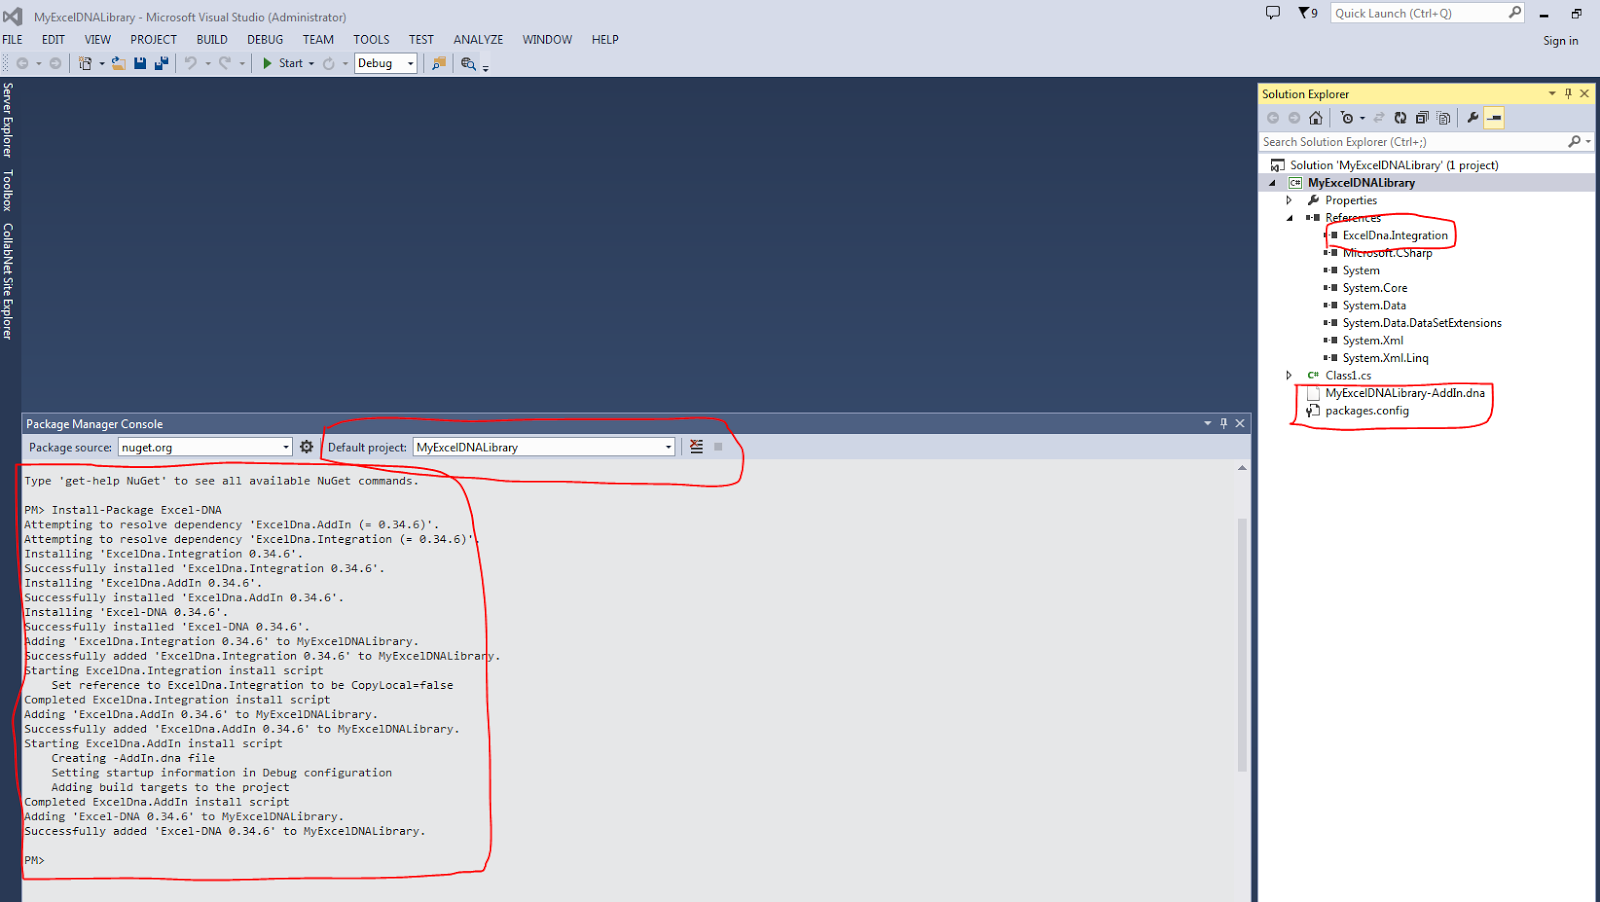
Next step you need to do is add Excel-DNA add-in to your class library project. This can be done using NuGet Package Manager ( this is included in most of the recent visual studio versions).

In your Visual Studio, go to View menu at the top and the Other Windows and select Package Manager Console. This will open Package Manager Console pane. Please see below


Note : In Package Manager Console make sure you select the correct project under default project dropdown. In above image the red circled one.

Give the following command next to PM> in Package Manager Console and press Enter 
Install-Package Excel-DNA. 
You will get a bunch of text successful and complete messages and Excel-DNA add-in will
be added to your project.


Now your Solution Explorer must look like below


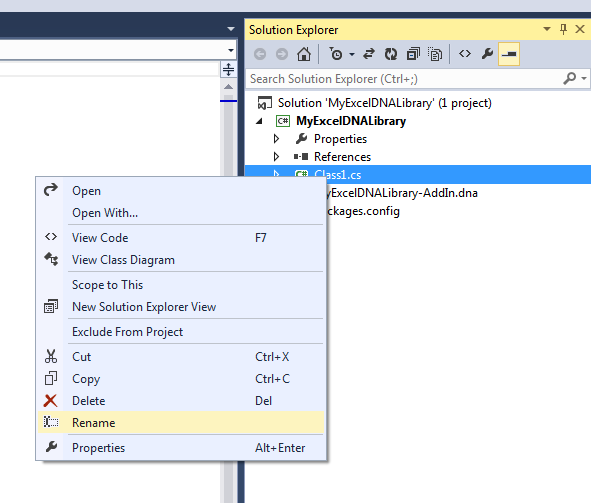
This step is optional. Open Solution Explorer and right click on Class1.cs and then select Rename to rename class to UDFHelper.


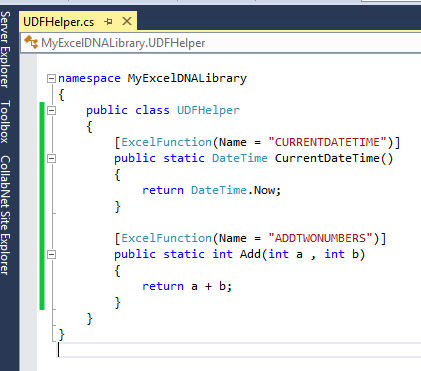
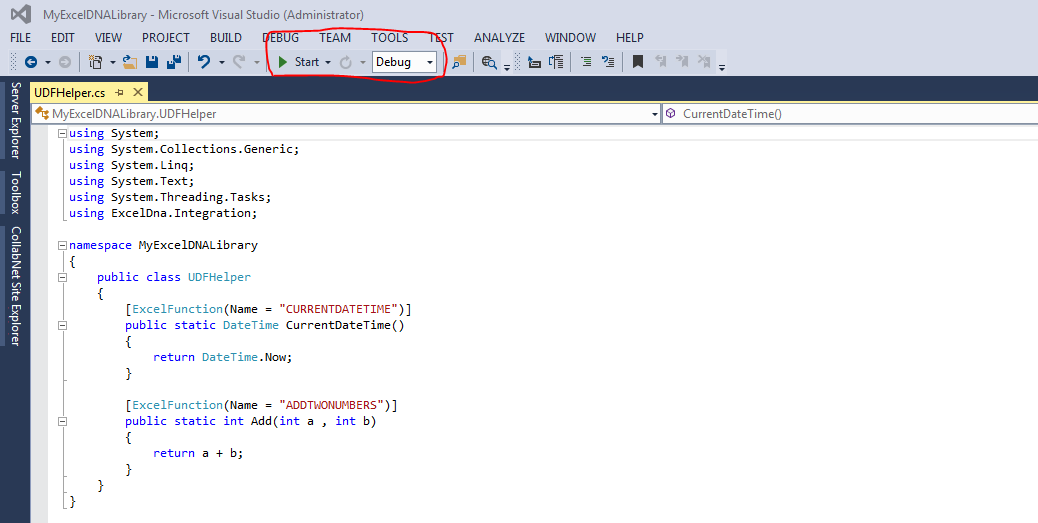
Now double click above class to open it and give using ExcelDna.Integration; at the top. Your class must look like below


To make things simple, let's add a function that gets current date and time like below

    [ExcelFunction(Name = "CURRENTDATETIME")]
    public static DateTime CurrentDateTime()
    {
        return DateTime.Now;
    }

Lets also add a function that adds 2 numbers and returns result
       [ExcelFunction(Name = "ADDTWONUMBERS")]
        public static int Add(int a , int b)
        {
            return a + b;
        }

Now your class must look like below


ExcelFunction tells that the function must be exposed in Excel as work sheet function. 
[ExcelFunction(Name = "CURRENTDATETIME")] tells that .NET C# CurrentDateTime function must be exposed in Excel as CURRENTDATETIME.
[ExcelFunction(Name = "ADDTWONUMBERS")] tells that .NET C# Add function must be exposed in Excel as ADDTWONUMBERS.

In Solution Explorer right-click on your Excel-DNA Class Library project and select Properties. This will open properties tab. Go to Debug and make sure you have Excel.exe location
for Start external program. In my case it was C:\Program Files (x86)\Microsoft Office\Office14\EXCEL.EXE

If you have 32-bit Excel then you can skip below steps and go directly to testing. If you have 64-bit Excel please follow bekow steps.
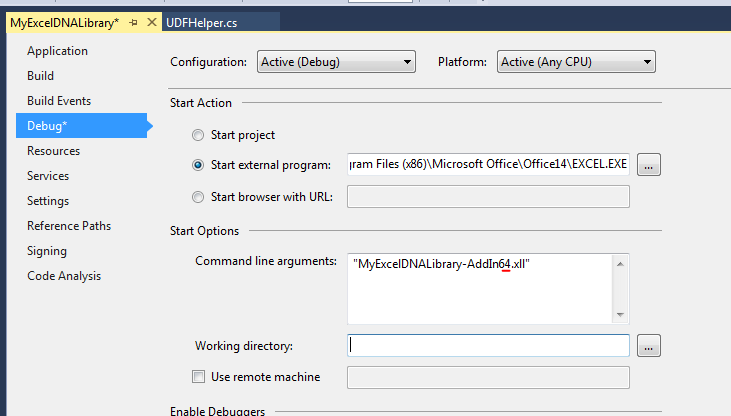
64-bit Excel:
In Solution Explorer right-click on your Excel-DNA Class Library project and select Properties. This will open properties tab. Go to Debug.


In Command line arguments : add 64 before .xll  for example "MyExcelDNALibrary-AddIn64.xll" like below. This will tell that 64-bit version XLL will be loaded in Excel when you debug the application else you will get error


Test:
We are now ready to test. In Visual Studio, in command bar make sure you select Debug and then click on the green triangle to run the project or else press F5 on keyboard to run application.


If you donot have any compile errors, your solution will be compiled and Excel-DNA creates few xll files. Excel should be launched and depending on your security settings it will ask whether
to enable the add-in. Just select Enable button. This will open your Excel session.


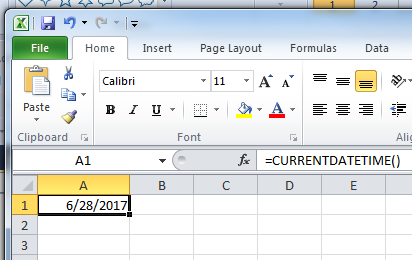
Select a cell in excel and give =CURRENTDATETIME() like below. ( If everything goes fine Excel intellisense will show the method like below).


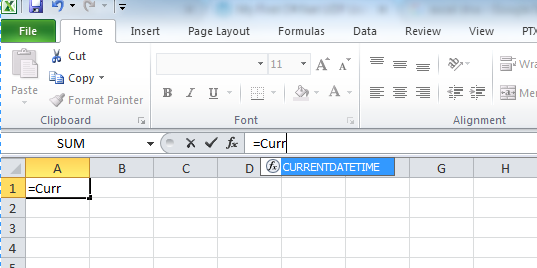
Select method like below to see result.


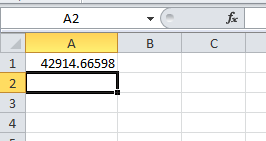
In order to format cell, select cell and right-click and follow below


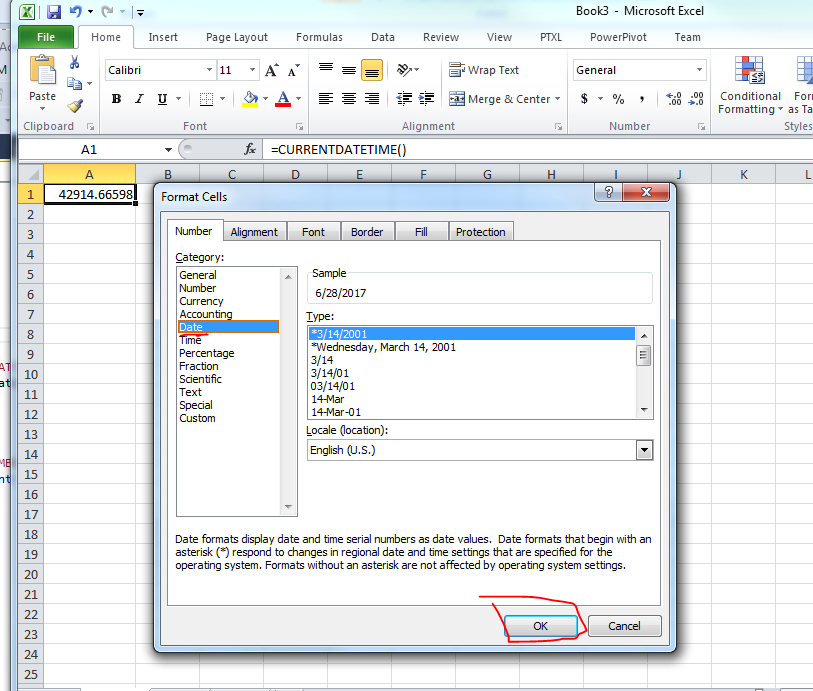
Now you must see sensible date like below


To use Add follow below


Conclusion :
In this article we saw how we can create user defined functions (UDFs) and use them in Excel using Excel-DNA add-in. We created functions using .NET and C#. In future post I will show you how to create custom ribbon bar in Excel and how we can add buttons to it and perform some functionality like open a web-browser and launch a sample page. Till then I hope you find this post useful.


I hope you enjoyed reading this post as much as I did while writing it. Please feel free to let me know your valuable and constructive comments and suggestions which can help me to make this article better and improve my technical and written skills. Last but not the least please excuse me for my grammar and typos.

Thanks and have a nice and wonderful day.


Saturday, February 25, 2017

Step by Step : Windows Phone 7 : Setting Up Development Environment

Hi,
Welcome to my blog of Windows Phone 7 Development. In this series of posts, I will try to explain various concepts in Windows Phone 7 Development. We will try to learn how to develop applications for Windows Phone 7.  So lets start.

In this post we will see how to set up Windows Phone 7 Development environment.

Introduction: 
Windows Phone 7 Development targets developing applications for Windows Phone 7 mobile operating system developed by Microsoft..NET framework is used to do Windows Phone 7 Development created by Microsoft. We can use any one of the several languages supported by the .NET framework, like C# to write applications which gets executed inside of a runtime environment called the Common Language Runtime. There are two distinct development approaches you can take when creating your application.

First Approach:
The first approach is to use Silverlight for Windows Phone. Silverlight is used by developers to create rich internet applications. A Silverlight application uses declarative markup (called XAML) to create user interface and code written in a .NET framework language to control an application’s behavior. For developing a data driven application for Windows Phone 7, we need to use Silverlight.

Second Approach:
The second approach is to use the XNA framework to develop your Windows Phone 7 app. It is Microsoft’s game development framework and has been used in recent years to create both Windows and Xbox 360 applications. If you’re creating a game for Windows Phone 7, you’ll likely use the XNA framework. The XNA framework is quite powerfu and need a great deal of learning curve and longer development cycles.

Installing SDK:
The Windows Phone 7 SDK is supported with one of the below operating systems except starter ( express ) versions
  • Windows Vista
  • Windows 7
Note : You cannot develop Windows Phone 8 applications using Windows Phone 7 SDK.
Hardware Requirements :
  • Minimum 4GB hard disk space
  • Minimum 3GB RamDirectX 10 or above capable graphics card with a WDDM 1.1 driver
Please go to below link and download and install below items
http://dev.windows.com/en-us/develop/download-phone-sdk
  • Windows Phone SDK 7.1
  • Windows Phone SDK 7.1.1 Update


This will install the following in your system
  • Microsoft Visual Studio 2010 Express For Windows Phone
  • Windows Phone Emulator
  • Windows Phone SDK 7.1 Assemblies
  • Silverlight 4 SDK and DRT
  • Windows Phone SDK 7.1 Extensions for XNA Game Studio 4.0
  • Micorosoft Expression Blend SDK for Windows Phone 7
  • Microsoft Expression Blend SDK for Windows Phone OS 7.1
  • WCF Data Services Client for Windows Phone
  • Microsoft Advertising SDK for Windows Phone
If your installation goes fine you will have all the necessary software requirements that are needed to develop Windows Phone 7 mobile applications.

Conclusion:
In this post we saw what are the hardward and software requirements to develop Windows Phone 7 applications and how we can install Windows Phone 7 SDK that will install the required components to start developing Windows Phone 7 applications.

In next post we will develop our first Windows Phone 7 application which is Hello World application.
I hope you enjoyed reading this post as much as I did while writing it. Please feel free to let me know your valuable and constructive comments and suggestions which can help me to make this article better and improve my technical and written skills. Last but not the least please excuse me for my grammar and typos.

Thanks and have a nice and wonderful day.


Wednesday, July 22, 2015

Step By Step : Custom Configuration Section in Configuration File

Hi,

Welcome to my blog. In this post we will see how to add custom configuration section to your config files and read those values. I added a custom configuration section called CountriesConfigSection in my App.config and will read values from it and access them in my Windows form application. In my App.config, the CountriesConfigSection will have entries for states belonging to a particular country. As shown below, I have 4 states for USA country and I will display names of USA states in a combobox in my Windows Form application.

App.Config


This is just one of the way which I followed  I am not saying this is the best and it doesnot have cons. My main aim is to share my experience so that it will be useful for the needy. I tried to make this post as much interesting as possible. Please excuse me for my grammatical errors and typos. I welcome your constructive comments and suggestions which helps in improving this post and my technical skills.

Overview: 
In this example we will see how we can create custom configuration section in our app.config and how we can access the values in our code. We will create the following projects

1) CustomConfigSections : This is Windows Forms project.

Now let's start our work
For this article, I am using the following tools/technologies to develop a my sample application
Visual Studio 2013
C#
.NET Framework 4.5

I always have the habit of creating empty solution first and then work on it. Here also I did same thing. I created an empty visual studio solution titled "CustomConfigSections"
 I added a new Windows Forms project called "CustomConfigSections".
Solution


Steps:
1) Open your App.config and add do below steps. Please see below screen shot
a) Inside <conifguration> add this
    <configSections>
    <section name="CountriesConfigSection" type="CustomConfigSections.CountriesConfigSection, CustomConfigSections"></section>
  </configSections>

 This step is important. It tells that we are adding our custom configuration section with name and of particular type.
  b) After above step add this
   <CountriesConfigSection>
    <USA>
      <State name="Alabama" capital="Montgomery" symbol ="AL" population="100"/>
      <State name="Alaska" capital="Juneau" symbol ="AS" population="50"/>
      <State name="Arizona" capital="Phoeniz" symbol ="AZ" population="300"/>
      <State name="California" capital="Sacremento" symbol ="CA" population="600"/>
    </USA>
  </CountriesConfigSection>

This is our actual custom config section. Please make sure that it matches the name in step 1 ( above )
App.config must be like below


Close your App.config and save it and build your solution to make sure nothing broke.

2) Add System.Configuration to your Windows Forms project. 


3) Create a new class and name it as CountriesConfigSection.cs and add using System.Configuration at top

4) If you examine our custom config section (<CountriesConfigSection>) in App.config you will notice that we have hierarchical structure. We have collection of countries section (CountriesConfigSection) and in that for each country ( USA ) we have State. So lets start from lowest level ( State ) first. Open CountriesConfigSection.cs and create State class which is a Configuration Element like below which creates properties and matches to respective attribute in <State> Configuration Element in App.config inside our custom config section (<CountriesConfigSection>)

public class State : ConfigurationElement
    {
        [ConfigurationProperty("name", IsRequired = true)]
        public string Name
        {
            get { return (string)this["name"]; }
            set { this["name"] = value; }
        }

        [ConfigurationProperty("capital", DefaultValue = "", IsRequired = true)]
        public string Capital
        {
            get { return (string)this["capital"]; }
            set { this["capital"] = value; }
        }

        [ConfigurationProperty("symbol", DefaultValue = "", IsRequired = true)]
        public string Symbol
        {
            get { return (string)this["Symbol"]; }
            set { this["Symbol"] = value; }
        }

        [ConfigurationProperty("population", DefaultValue = "", IsRequired = true)]
        public string Population
        {
            get { return (string)this["population"]; }
            set { this["population"] = value; }
        }       
    }

After State configuration Element we need to create ConfigurationElementCollection that stores all Configuration Elements. Lets create USAStatesCollection class like below

public class USAStatesCollection : ConfigurationElementCollection
    {
        protected override ConfigurationElement CreateNewElement()
        {
            return new State();
        }

        protected override object GetElementKey(ConfigurationElement element)
        {
            return ((State)element).Name;
        }
    }


Now at last we need to create a class to hold our Custom Configuration Section itself. So lets create CountriesConfigSection like below.
This will have a method (GetConfig) that will read App.config and get our custom config section. This also has a property to hold our ConfigurationElementCollection of type <USA>.

public class CountriesConfigSection : ConfigurationSection
    {
        public static CountriesConfigSection GetConfig()
        {
            return (CountriesConfigSection)System.Configuration.ConfigurationManager.GetSection("CountriesConfigSection") ?? new CountriesConfigSection();
        }

        [System.Configuration.ConfigurationProperty("USA")]
        [ConfigurationCollection(typeof(USAStatesCollection), AddItemName = "State")]
        public USAStatesCollection USAStates
        {
            get
            {
                object o = this["USA"];
                return o as USAStatesCollection;
            }
        }
    }

   
At last our CountriesConfigSection.cs must look like below

using System;
using System.Collections.Generic;
using System.Linq;
using System.Text;
using System.Configuration;

namespace CustomConfigSections
{
    public class CountriesConfigSection : ConfigurationSection
    {
        public static CountriesConfigSection GetConfig()
        {
            return (CountriesConfigSection)System.Configuration.ConfigurationManager.GetSection("CountriesConfigSection") ?? new CountriesConfigSection();
        }

        [System.Configuration.ConfigurationProperty("USA")]
        [ConfigurationCollection(typeof(USAStatesCollection), AddItemName = "State")]
        public USAStatesCollection USAStates
        {
            get
            {
                object o = this["USA"];
                return o as USAStatesCollection;
            }
        }
    }


    public class State : ConfigurationElement
    {
        [ConfigurationProperty("name", IsRequired = true)]
        public string Name
        {
            get { return (string)this["name"]; }
            set { this["name"] = value; }
        }

        [ConfigurationProperty("capital", DefaultValue = "", IsRequired = true)]
        public string Capital
        {
            get { return (string)this["capital"]; }
            set { this["capital"] = value; }
        }

        [ConfigurationProperty("symbol", DefaultValue = "", IsRequired = true)]
        public string Symbol
        {
            get { return (string)this["Symbol"]; }
            set { this["Symbol"] = value; }
        }

        [ConfigurationProperty("population", DefaultValue = "", IsRequired = true)]
        public string Population
        {
            get { return (string)this["population"]; }
            set { this["population"] = value; }
        }       
    }

    public class USAStatesCollection : ConfigurationElementCollection
    {
        protected override ConfigurationElement CreateNewElement()
        {
            return new State();
        }

        protected override object GetElementKey(ConfigurationElement element)
        {
            return ((State)element).Name;
        }
    }
}


Now save all items and build your solutions to make sure you donot have any errors.

5) Thats all we are done setting up to read custom configuration section in App.config. The final step is to access them and use them in our Winforms application. Please see below code which self explanatory. I am trying to get USA States name and display them in Combobox as shown in below screen shot.

 private void Form1_Load(object sender, EventArgs e)
        {
            List<string> usaStatesNames = null;
            CountriesConfigSection config = CountriesConfigSection.GetConfig();
            if (config != null && config.USAStates != null && config.USAStates.Count > 0)
            {
                usaStatesNames = new List<string>();
                foreach(State usaState in config.USAStates)
                {
                   
                    usaStatesNames.Add(usaState.Name);
                }
            }

            cmbStates.DataSource = usaStatesNames;
            cmbStates.SelectedIndex = 0;
        }


That's it. Build your code and run the app and if everything goes fine you will get something like shown in above image.

Conclusion:
In this article we learned how we can add custom configuration section in our App.config and how to read them and access them in our Windows Forms application.

Please feel free to let me know your valuable and constructive comments and suggestions which can help me to make this article better and improve my technical and written skills. Last but not the least please excuse me for my grammar and typos.

Thanks and have a nice and wonderful day.

Thursday, April 23, 2015

Step by Step : Windows Phone 7 : First Application

Hi,
Welcome to my blog of Windows Phone 7 Development. In this series of posts, I will try to explain various concepts in Windows Phone 7 Development. We will try to learn how to develop applications for Windows Phone 7.  So lets start. This post is not an exhaustive account about .NET Framework, C# concepts, Visual Studio 2010 and doesnot tell you all about Phone Emulator. This post takes into consideration that you have background knowledge ( at least beginner level ) on concepts like .NET, C#, Visual Studio and so on.

Please see my previous post titled "Windows Phone 7 : Setting Up Development Environment" to know how to setup your Windows Phone 7 Development environment. In this post we will see step by step to do the following
  • Develop of First Application which is Hello World application
  • How to change our start up page for our application

Hello World application:
Lets roll up our sleeves and start developing Windows Phone 7 applications. Lets start by developing typical Hello World application so that we can get familiar with developing and running Windows Phone 7 applications.

Launch Microsoft Visual Studio 2010 Express for Windows Phone.


Add new project. Make sure you select Silverlight for Windows Phone under Visual C# in Installed Templates. Select Windows Phone Application as shown in below screen shot and give name as HelloWorld


Next you will get a popup as shown below that will ask for Target Windows Phone OS version. For our learning we will use Windows Phone OS 7.1 and click OK.


Next as shown in below figure drag and drop a Button and TextBlock from Toolbox and change below properties
Button
Name : btnClickMe
Content : Click Me

TextBlock
Name : txtMessage
Text:
 Width : 400


Now double click on Click Me button. This will open MainPage.xaml.cs and will add a method btnClickeMe_Click. This means whenever we click/press Click Me button this method will be executed. Please change the method as shown below. Here we are assigning text for our txtMessage TextBlock to Hello World !

private void btnClickMe_Click(object sender, RoutedEventArgs e)
        {
            txtMessage.Text = "Hello World !";
        }

Running and Debugging the application:
The easiest way to run the application is to press F5 key on your keyboard. So please press it. If you have any errors it will show them in Error list. If there are no errors Phone Emulator will launch as shown in below image. Phone Emulator is a component that runs your Windows Phone 7 apps that simulates as if you are running the application in any one of the Windows Phone mobiles. This will be helpful in testing all most all features of Windows Phone 7 application features except few. Sometimes Phone Emulator will take sometime to load your application so please be patient.


Now press Click Me button and you will notice the Hello World ! text will be displayed. You can even keep a break point as shown in below screen shot and notice that it hits the line and there by you can debug your code.


Setting start up page:
Instead of setting default MainPage.xaml as our startup page we can set our own page as startup page. Lets see how we can do this. Right click on MainPage.xaml in Solution Explorer and press delete as shown in below image


Build your solution to make sure you donot have any errors.

Add a new Windows Phone Portrait Page as shown in below screen shots by right clicking on your project ( here HelloWorld) in Solution Explorer. Name the page as MyFirstXamlPage.xaml


Now add a button and textblock as you did for MainPage.xaml. Please see above for more details.
Now open WMAppManifest.xaml as shown in below image and update below DefaultTask tag.

 <Tasks>
      <DefaultTask  Name ="_default" NavigationPage="MyFirstXamlPage.xaml"/>
    </Tasks>


Now press F5 and if everything goes fine the application will be launched in Phone Emulator.

Conclusion:
In this post we saw how to develop a simple Windows Phone 7 application and how to change the start up page.I hope you enjoyed reading this post as much as I did while writing it. Please feel free to let me know your valuable and constructive comments and suggestions which can help me to make this article better and improve my technical and written skills. Last but not the least please excuse me for my grammar and typos.

Thanks and have a nice and wonderful day.